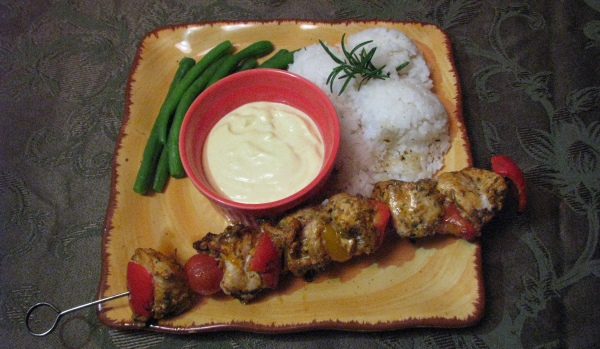
Pinchos Marunos or "Moorish Kababs" are Spanish tapas enjoyed in tabernas (taverns) throughout much of Spain. Tapas (from the Spanish verb tapar meaning "to cover") are snacks eaten between meals, usually along with generous amounts of wine. The origin of their name may have come from the custom of covering a glass of wine with a piece of bread or meat to keep insects at bay. There are innumerable types of tapas but they are not so much a kind of food as a style of eating. Often tapas are eaten whilst standing at a tapas bar conversing with one's friends and acquaintances. As free-flowing sociality is key to their enjoyment, tapas are not generally served in restaurants or at home per se, although some of the exact same dishes can be served as appetizers. The dish goes well with wine or port.
Although found throughout Spain, tapas are most popular in Andalusia, sometimes referred to as "Moorish Spain," as the area was for more than 700 years governed by Muslims. Despite this history, Pinchos Marunos might have been brought to Spain by more recent immigrants from Northern Africa. Ironically, present day Pinchos Marunos are usually made with pork, which is haram (forbidden) to Muslims. Chicken or beef can also be used with delicious results. While "all meat" kabobs are typical, cherry tomatoes, red bell peppers, and even fruits such as honeydew melons or grapes can be added for a taste twist.
Allioli, or garlic and lemon mayonnaise, is a very popular ingredient or accompaniment in Spanish cooking. While allioli is a bit labor-intensive to make in the traditional way (lots of whisking required), a reasonable approximation can be achieved using regular mayonnaise flavored with garlic and lemon juice. Pinchos Marunos can be eaten with or without a sauce like the saffron-infused allioli presented here.
Ingredients:
- 2 tablespoons chopped yellow onions
- 4 large garlic cloves, chopped fine
- 1 tablespoon sweet (preferably smoked) paprika
- 1/4 teaspoon cayenne pepper (or twice that if you have hot paprika)
- 1 teaspoon dried oregano
- 2 teaspoons drived thyme
- 1 teaspoon ground cumin
- 1/8 teaspoon ground cinnamon
- 1 bay leaf, crumbled
- 2 tablespoons white wine vinegar
- 2 tablespoons dry white wine (optional)
- 3 tablespoons olive oil
- 1 1/2 pounds of chicken breasts cut into 3/4" cubes (pork or beef may be substituted)
- Salt and pepper to taste
Preparation:
- Combine all of the ingredients except the meat in a food processor and grind into a paste.
- In a large bowl, thoroughly mix the spice paste and the meat cubes.
- For best taste, refrigerate the marinaded meat for 4 to 6 hours.
- If using bamboo skewers, soak them in water for a half hour prior to using them.
- Skewer the meat. If you are adding other ingredients such as tomatoes or sweet peppers, alternate with the meat.
- Grill over a medium heat on your BBQ until the desired doneness is achieved.
- Serve as a tapas allowing guests to drizzle (or spoon, the stuff should be thick) the saffron allioli on top of the meat.
Saffron Allioli
Allioli, or garlic and lemon mayonnaise, is a very popular ingredient or accompaniment in Spanish cooking. While allioli is a bit labor-intensive to make in the traditional way (lots of whisking required), a reasonable approximation can be achieved using regular mayonnaise flavored with saffron, garlic and lemon juice.
Ingredients:
- 2/3 cup extra-virgin olive oil
- 1/3 cup canola oil
- 4 large garlic cloves, minced finely or crushed in a garlic press
- 2 large egg yokes
- 4 teaspoons of fresh lemon juice
- salt
- several strands of saffron
Preparation:
- Pulverize the saffron strands in a mortar and then add two tablespoons of boiling water. Let cool.
- Mix oils in a measuring cup that has a spout or pouring lip.
- In a mixing bowl, mix the minced garlic cloves, egg yokes and lemon juice until they form into a consistent a paste.
- Very very slowly (in a very small stream) add the oil to the mixture. It should emulsify while blending.
- When thickened, whisk in the saffron and water.
- Whisk in salt a little at a time, until the level of saltiness you enjoy is achieved.
Quick Way:
Crush the garlic in a garlic press and then combine all the ingredients above (except the eggs and oil) with one cup of your favorite mayonnaise.
Recipes adapted from Anya von Bremzen's The New Spanish Table.
- Details
- Hits: 4336
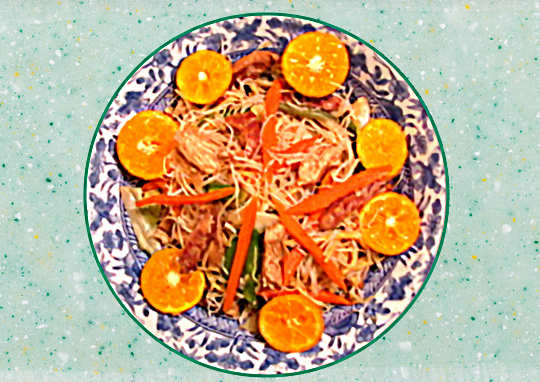
Filipino Pancit Bihon is a delicious, easy to prepare rice noodle dish perfect for a summer meal. Garnished with Calimansi fruit, the dish embraces the Southeast Asian culinary taste quartet of savory, salty, sweet and sour. Pancit Bihon is a quintessential Filipino dish made with meat, vegetables and thin rice noodles. For a vegetarian version, just leave out the meat or substitute tofu. Pancit means noodles and bihon (or bihun) are thin "vermicelli" rice noodles. As they can be cooked and prepared quickly, they can be considered a Filipino fast food. Noodles and the lore associated with them may have originated in China. Long noodles represent long life and Pancit Bihon are often prepared for birthday celebrations (sometimes they are even called "birthday noodles" in restaurant menus). There are as many variations of Pancit Bihon as there are cooks, so feel free to experiment with other meats and vegetables. Calimansi, which are used as a garnish in this recipe, are small citrus fruits that are sweet and sour. You can eat the whole fruit, rind and all. Their palate-cleansing acidity and dash of sweetness goes quite well with this recipe.
Ingredients:
- An 8 ounce package of Pancit Bihon rice noodles (obtainable at Asia grocery stores)
- 1/2 lb chicken breast (cut into strips)
- ½ package of Chinese pork sausages (sliced into strips)
- 2 cloves garlic (minced, pressed or crushed)
- 1 medium onion (cut into thin strips)
- 2 carrots (julienne cut)
- 1/4 pound of snow peas
- 1 head of a small cabbage (julienne)
- ½ pound of green beans (diagonally cut into small pieces); can substitute thawed frozen French-style green beans.
- 3 stalks of celery (cut into small, thin strips)
- 2 cups of chicken broth
- 3 tablespoons soy sauce
- 3 tablespoons peanut oil
- Salt and pepper to taste
- 3 scallions sliced thinly (for garnish)
- several Calimansi (halved or quartered) or lemon slices
Preparation:
Preparatory note: The onion, carrots, cabbage, green beans, celery, and meat (sausage and chicken) should be cut into short (2 inch), thin (1/4 inch) "sticks" (much like julienne). Another way to prepare the chicken is to boil it until tender and then shred it. Pork and shrimp can be added to or substituted for the chicken.
- Soak noodles in warm water for 15 minutes, drain and set aside.
- Mince or crush garlic and set aside.
- Slice scallions thinly and set aside.
- Cut up onion, cabbage, green beans and celery per instructions above.
- Cut up chicken and sausage per instructions above.
- In 3 tablespoons of peanut oil, brown the Chinese sausage in a wok.
- Add in minced garlic and sliced onions to wok and sauté until onions are translucent.
- Add chicken strips and continue cooking until the chicken is cooked through.
- Add the chicken broth and all the remaining vegetables and cook for an additional three minutes, stirring constantly.
- Mix in softened noodles, toss and cook until the broth is absorbed, but not too dry.
- Add soy sauce, salt, and pepper to taste.
- Sprinkle dish with thinly sliced scallions.
- Serve hot with sliced Calimansi or lemon slices as an edible garnish.
- Diners may add additional soy sauce if desired.
Based on a recipe submitted by Sherry Sebastian (her mom's recipe!)
- Details
- Hits: 4118
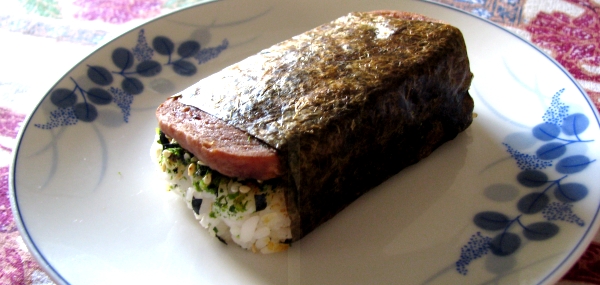
Hawaiian SPAM Musubi is a unique Japanese/Hawaiian fusion snack found just about everywhere in the Aloha state. SPAM maybe maligned on the mainland but it is a treasured treat in the Hawaiian Islands. SPAM's reputation has not been enhanced by the word becoming synonymous with "unsolicited email" in the digital world. Set your culinary preconceptions aside, try these, you are sure to like them!
The popular Hawaiian snack SPAM musubi can be found in local food markets in Hawaii. In its most basic form it is made from lightly flavored white rice and a slice of SPAM wrapped in dried seaweed paper typically used to make sushi. Recipes also include fried egg, teriyaki sauce, or furikake (a Japanese condiment consisting of fish flakes, seaweed, sesame seeds and spices) for added flavor. It's a simple snack perfect for when you are on-the-go.
Ingredients:
- 2 cups short-grain white rice
- 1 can of SPAM
- 6 tablespoons rice vinegar
- ¼ cup soy sauce
- ¼ cup oyster sauce
- 5 sheets sushi nori (dry seaweed)
- 2 tablespoons vegetable oil
- furikake seasoning
- some wax or parchment paper
Preparation:
- Cook rice in a rice-cooker or covered pot according to package instructions
- When the rice is cooked, stir in rice vinegar and set aside to cool
- Open the can of SPAM, remove it (punching a hole in the bottom of the can helps) and then slice the SPAM into 8 equally thick slices
- In a bowl, mix together soy sauce and oyster sauce/li>
- Coat the SPAM in the mixture soy sauce and oyster sauce and let sit for 5 minutes
- Heat oil in a frying pan on medium/low heat. Fry the SPAM for 2 minutes on each side or until lightly brown
- Cut nori sheets in half. Folding the sheets in hand and then cutting on the crease with a sharp knife or kitchen scissors helps.
- Place a scoop of rice on a piece of wax paper. Using your fingers and the paper, press and shape the rice into a rectangular block the size of a slice of SPAM and about an inch thick (see photo)
- Sprinkle furikake seasoning on the rice.
- Top the furikake layer with a slice of fried SPAM.
- Take the half sheet of nori and form it around three sides of the SPAM and rice.
- With your hand under the wax paper, carefully flip the musubi over into your other hand(nori side down)
- Peel the paper off the rice and then wrap the remaining free nori around the rice sealing the edges with a small amount of water. (note: You can purchase a "musubi mold" to make musubi, but it's really necessary)
Recipe submitted by Monica Emery
Photography by Shari Johnston-O'Neill
- Details
- Hits: 4374
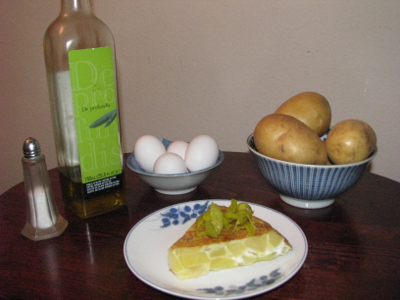
The recipe of the month is Spanish Tortilla de Patata otherwise known as a "Spanish Omelet." It can be served as a tapas (snack), a light meal or even between to halves of a baguette and enjoyed as a sandwich. It is found throughout Spain. The basic ingredients in the quintessential tortilla are simple; olive oil, potatoes, onion and egg. The choices you make with these basic ingredients will make a significant difference in the results. You can, of course, add whatever else that suits your fancy; cooked Spanish chorizo, green or red peppers, zucchini, eggplant, mushrooms, peas or diced ham. This recipe is the most basic form of the recipe but should yield amazing results if the ingredients are well chosen. Start with Spanish Olive oil, not all olive tastes the same, why not try something authentic like de Profundis. Light olive oil is better for cooking at higher temperatures, but this dish begs for extra virgin. Use white potatoes or Yukon Gold potatoes, they won't get mushy and fall apart. Use yellow onions, which turn slightly sweet when cooked. Use good eggs; free-range and organic, for no other reason than they usually taste better. It is very popular to eat Spanish tortilla with some nice crusty bread. A bit of Spanish wine might help too.
Only one part of the preparation needs a bit of fine motor skills and there is a way to get around this in an acceptable manner. A Spanish Tortilla is much thicker than a French omelet and some are thicker than others. Halfway through cooking the Tortilla has to be flipped over. If you are extremely skilled you can do this with a wide spatula. If you are a little less skilled you can hold a plate over the pan, flip the pan over and then slide the tortilla back into the pan to finish cooking it. There is actually a plate made specially for this task called a
Ingredients:
- 1 1/2 cups extra-virgin olive oil
- 1 1/2 pounds large Yukon Gold potatoes, peeled, quartered, cut into 1/4" slices
- 1 yellow onion, quartered, thinly sliced
- 2 1/2 teaspoons salt
- 8 large eggs, beaten lightly to blend (don't whip)
* Feel free to experiment with the egg/potato proportions, if you want your tortilla to be more eggy or more potatoey.
Preparation:
- Pour the oil into a skillet non-stick is helpful. Unless the pan has rather straight sides, you may have to use the broiler method.
- Cook the onions and potato slices on medium. Turn and move pieces about. Do not brown either the potatoes or onion. A bit of patience is required, it might take up to 25 minutes to cook the potatoes fully.
- When the potatoes are tender (not too soft!), remove them placing them in a colander or a big strainer.
- In a big bowl gently mix the potatoes, onions, eggs and salt being careful not to break the potato slices up.
- Return the mixture to a lightly oiled frying pan set on medium low heat. Some recipes call for starting out with a high heat. I respectfully disagree and believe that eggs combined with high heat are almost always a dreadful mistake. Next time you cook scrambled eggs try doing so on low heat, I guarantee you will be pleasantly surprised by the results. It takes a bit more time, but it's worth it.
- Cook the tortilla until it is lightly browned on the bottom. Placing a lid on the pan will help if the tortilla is thicker. The thicker your tortilla is, the lower the heat should be and the more patience you will require. After several minutes you can lift up a side of the tortilla with a spatula to check doneness.
- Now you have arrived that the 3 pronged fork in the road and a decision has to be made; to flip the tortilla with a big flat spatula, flip it and then slide it back into the pan with a plate (it's really not that hard), or simply brown the top under a broiler. I will leave this weighty decision to you!
Spanish Tortilla de Patata is traditionally eaten after it has cooled to room temperature. Even with so few ingredients, done right it's a culinary marvel.
Recipe by T. Johnston-O'Neill
- Details
- Hits: 4308
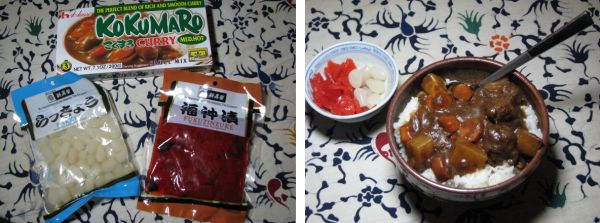
Relatively easy to make once you have all the proper ingredients, Japanese kare-raisu (Japanese Curry) is great for lunch and goes well with Japanese pickles and beer (tsukemono). Our intern from Japan, Kanako, brought this dish for lunch and we immediately knew it was worthy of "Recipe of the Month"! Enjoy. Douzo tabete kudasai!
Japanese curry is a thick, smooth and sweet curry that is quite different in texture and taste from Indian curries. Japanese curry is always served over a bed of Japanese short-grained rice and is consequently always called kare-raisu.
The spices for Japanese curry often come in powder form or flat bricks that you break apart, much like one would a bar of chocolate. The brand names are sometimes quite cross-cultural, like Java, House, and Vermont. Other brands found in the U.S. include Kikkoman, S&B & Kokumaru. Spice (and thickener) mixtures come in mild, medium and hot versions. Spiciness is not the only difference between these brands, as each of these spice mixtures have their own unique taste and some cooks even mix the spice concoctions in varying proportions to achieve the taste they desire
Other than the thickening spice mixture, basic ingredients are potatoes, onions, carrots and meat. Dark-meat chicken is used frequently, however chicken breasts, beef or pork can also be used. The type of meat being used is often related to regions of Japan: pork is used in the north, beef is preferred in central Japan and chicken is most popular in the south, but all can be found throughout Japan. Individual cooks achieve variety by adding additional ingredients, including apples, coffee, peas, caramelized onions, ginger, garlic, cayenne pepper, ketchup, Tonkatsu sauce, Worcestershire sauce, and whatever else pleases the cook's palate. Regional curries have ingredients as diverse as scallops, pears, mackerel, oysters and bitter melon. The important goal when cooking kare-raisu is that vegetables and meat be soft yet firm, so the cooking time and temperature are important in order to achieve best results.
Japanese curry can also be bought pre-packaged, which is quite popular in Japan, but varies in quality. Kare-raisu is the main course served to members of the Japanese defense forces every Friday and is a popular food to eat while camping.
Even though Japanese curry is thick and Japanese rice is somewhat sticky, kare-raisu is typically eaten with a large spoon rather than hashi (chopsticks). It is often served with tsukemono vegetables pickled in vinegar such as fukujinzuke (a pickle made of daikon, which is Japanese radish, eggplant, lotus root, cucumbers and a variety of other ingredients) or rakkyo (scallions pickled with vinegar, salt, soy sauce and sugar). The importance of tsukemono should not be underestimated because the crunchy acidic tartness contrasts nicely with the sweet thick taste and feel of the kare-raisu.
Kare-raisu is thought to have been introduced to Japan by English sailors during the Meiji period, at the end of the 19th century.
Ingredients:
- 1/2 package Kokumaro curry
- 1/2 lbs of your choice of meat, diced or sliced thickly (this recipe uses beef).
- 1 large potato
- 1 medium carrot
- 1/2 Fuji apple, grated
- 1 medium-sized white onion, half finely chopped, half cut in wedges
- 1 clove of garlic, crushed or grated
- 1 cup of Red wine (secret ingredient!)
- 2 tablespoons instant coffee
- 1 tablespoon oyster sauce
- 1 1/2 cups water
- Salt and pepper
- Canola or Peanut oil
Preparation:
- Dice the potatoes and carrots into half-inch cubes or pieces (not too small!).
- Finely dice half the onion and then cut the remainder into small wedges.
- Sprinkle a moderate amount of salt and pepper on both sides of beef.
- Combine red wine, curry powder and grated garlic in a bowl (marinade).
- Place beef in a small container, pour marinade over beef and then refrigerate for at least 15 minutes.
- Slice the beef into small strips.
- Sauté the chopped onion in 2 tablespoons of oil in a frying pan. Use low heat for up to 30 minutes until the onions are caramelized.
- Remove beef from marinade, drain and reserve the wine.
- In a fry pan set on high, brown the beef in a tablespoon of oil.
- Transfer beef to the pot with the caramelized onions.
- Add the vegetables and water and simmer for 5 minutes.
- Add grated apple and marinade sauce and simmer for another 10 minutes.
- Add water (preheat to boiling) and gently simmer until potatoes are just soft. If foam forms on the top, skim it off.
- Add the curry seasoning and gently mix well until completely dissolved. Slicing the curry roux first helps it dissolve faster. If curry is too thick, add some extra water.
- Turn off the heat.
- Add instant coffee (or real coffee) and oyster sauce for added taste.
- Serve on top of rice in a bowl. Don't forget the tsukemono!
Recipe submitted by Kanako Masubuchi
Photographs by T. & S. Johnston-O'Neill
- Details
- Hits: 5059
Joomla!
Extensions
The Joomla! content management system lets you create webpages of various types using extensions. There are 5 basic types of extensions: components, modules, templates, languages, and plugins. Your website includes the extensions you need to create a basic website in English, but thousands of additional extensions of all types are available. The Joomla! Extensions Directory is the largest directory of Joomla extensions.
Components
Components are larger extensions that produce the major content for your site. Each component has one or more "views" that control how content is displayed. In the Joomla administrator there are additional extensions such as Menus, Redirection, and the extension managers.
Modules
Modules are small blocks of content that can be displayed in positions on a web page. The menus on this site are displayed in modules. The core of Joomla! includes 24 separate modules ranging from login to search to random images. Each module has a name that starts mod_ but when it displays it has a title. In the descriptions in this section, the titles are the same as the names.
Content Modules
Content modules display article and other information from the content component.
User Modules
User modules interact with the user system, allowing users to login, show who is logged-in, and showing the most recently registered users.
Display Modules
These modules display information from components other than content and user. These include weblinks, news feeds and the media manager.
Utility Modules
Utility modules provide useful functionality such as search, syndication and statistics.
Navigation Modules
Navigation modules help your visitors move through your site and find what they need.
Menus provide your site with structure and help your visitors navigate your site. Although they are all based on the same menu module, the variety of ways menus are used in the sample data show how flexible this module is.
A menu can range from extremely simple (for example the top menu or the menu for the Australian Parks sample site) to extremely complex (for example the About Joomla! menu with its many levels). They can also be used for other types of presentation such as the site map linked from the "This Site" menu.
Breadcrumbs provide users with information about where they are in a site.
Page 21 of 28


