
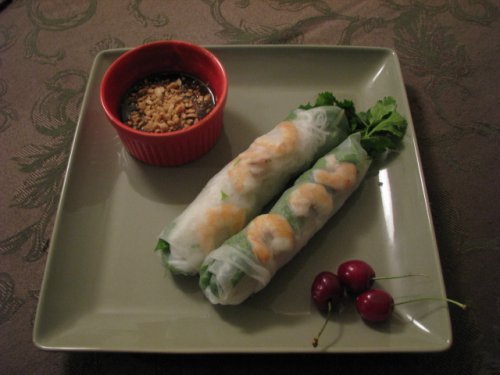
Gỏi Cuốn Vietnamese Summer Rolls are a refreshing summer treat. In American restaurants they are often sold as appetizers but in Vietnam they are typically eaten as a snack. Popular among students, Gỏi cuốn are usually sold by the piece in Vietnam. Gỏi cuốn literally means "salad roll." Basic ingredients are shrimp, pork, lettuce, Asian basil, rice noodles and rice paper wraps, Variations abound. Gỏi cuốn are not fried and are served cold or room temperature with Nuoc Leo dipping sauce.
Ingredients:
- 1/2 pound medium shell-on shrimp (36/40 size) de-veined
- 1/2 pound. pork loin (in an Asian grocery you might find julienned pork)
- 1 bunch of Thai basil
- 1 bunch of Asian mint
- 1 bunch of cilantro (the Vietnamese version is called rau ram)
- 1 head of green leaf lettuce shredded or chopped medium fine
- Package of 8 inch Rice Paper Rounds (banh trang)
- 4 ounces cooked rice vermicelli (bun) noodles
- 1 teaspoon sugar
- 1 teaspoon salt
Preparation:
- If using frozen shrimp, first completely thaw in cold water
- In a small sauce pan boil the pork with the salt and sugar until it is fully cooked. Completely cover the pork with water but not much, you will use the broth for the sauce
- When done remove pork from pan and set aside to cool
- Cook the shrimp in boiling salted water.
- Remove shrimp from pot and set aside to cool.
- Julienne the cooled pork
- Remove from the shells from the shrimp and discard shells
- Slice shrimp in half lengthwise. It is best to do this by laying a shrimp on a cutting board with the outside bend towards the hand you cut with. Press down lightly on the shrimp with your finger tips and with a sharp knife slice through the shrimp (needless to say, exercise all due caution!). If the shrimp was not de-veined to start with, remove the vein with the knife
- Cook the rice noodles according to the package directions. Typically you have to soak the noodles in water for 5 minutes or so and then cook them for another 5 minutes
- After rice noodles are finished cooking, immediately strain them and run cold water over them to stop them from cooking.
Dipping Sauce (Nuoc Leo) Ingredients.
- garlic chili sauce (to taste, start with one teaspoon)
- 1/4 cup broth from cooking pork
- ¼ cup tương (or Chinese hoisin) sauce
- ¼ cup roasted peanuts, chopped fine
- 1 fresh Thai red chili, seeded and thinly sliced (for garnish)
* Note: For more authentic Nuoc Leo, you can add a small amount of fried ground pork and pork liver. Optionally you can add smaill amounts peanut butter, sugar, tomato paste and finely chopped garlic.
Sauce Preparation:
Mix all the ingredients except the peanuts and fresh chilies. If the optional ingredients are used, fry the ground pork and liver first and add the remaining sauce ingredients (except peanuts and chilies) mix thoroughly over medium high heat for 2 to 3 minutes. Cool sauce before serving.
After the sauce is done sprinkle the top with the crushed/chopped peanuts and for color and zest top with a few thin slices of the red chilies. Assembling the Gỏi Cuốn
Note: The rice paper needs to be wetted in a large bowl (or deep plate) of water. It is best to prepare the summer rolls one at a time; soak, fill and roll. It only takes a few moments to sufficiently wet the rice paper, it will still be slightly stiff when removed from the water, but it will soften quickly, so don't over soak.
- Arrange all the ingredients around a clean cutting board.
- Completely dunk a sheet of rice paper into a large bowl of fresh water, let water run off and then lay flat on cutting board
- In the lower third of the rice paper sheet add layers of the ingredients above in a long mound parallel to your body. Layering order is up to personal preference, but to make them look like what you find in restaurants, put the halved shrimp (cut side facing down) on the top
- wrap ingredients like you are wrapping a burrito. Fold the bottom of the rice paper over the mound, fold in the sides and then roll everything forward to close the top. Some restaurants use two layers of rice paper, placing the halved shrimp in between the two layers so that the are clearly visible through the outermost layer of rice paper. Using two layers allows one to create a tighter neater wrap, but this is optional. Experiment until you get it right!
To serve, divide the sauce into as many dipping bowls (ramikins work great) as there are eaters. Sprinkle a goodly amount of crushed peanuts on the top of the Nuoc Leo sauce. For color and zest, sprinkle the top of the sauce with a few slices of the red chilies.
Gỏi cuốn is eaten with the hands. This is the easy part, just dip the end of the gỏi cuốn in the sauce and then take a bite! You will be surprised by the blend of flavors and the sensation of freshness provided by the mint, basil and the clean taste of the rice noodles. Enjoy!
Based on a recipe submitted by Colleen Nguyen.
- Details
- Hits: 4294

Hummus and falafel are both quite popular (particularly hummus) in America, but we would imagine most people buy them preprepared. But you can make your own and you will be delighted by the results.
In May of last year 300 chefs in Lebanon set the Guinness World Record for the largest plate of hummus. The previous record was set a few months earlier by 50 chefs in the Arab-Israeli village of Abu Ghosh near Jerusalem The Abu Ghosh chefs whipped up over four tons of the garbanzo-tahini concoction. In May of 2010, Lebanese cooks smashed this record with a staggering 11.5 tons of the savory dip. Seemingly every Eastern Mediterranean country has tried to lay claim to the best tasting hummus in the world. In the often fiercely partisan climate of the Middle East, hummus is a contested symbol of ethnic and national pride.
Hummus dates back to at least the 14th century in the Southeastern Mediterranean Levant. Hummus starts with two ingredients, boiled puréed garbanzo bean (aka chick peas) and puréed seasame seed paste (tahini). Any number of flavorings (most commonly lemon juice and salt) are added. Olive oil is also a common addition to the dip. Hummus is garnished or mixed with a variety of ingredients such as marinaded artichokes, carmelized onions, cilantro, chopped hard boiled eggs, garlic, chillies, ground cumin, cucumbers, mint leaves, olives, paprika, parsley, pine nuts, roasted red peppers, sumac (a lemony power made from sumac fruit), chopped tomatoes, sun dried tomatoes, and whole cooked garbonzo beans. We urge you to experiment with such options. In the Middle-East hummus is also sometimes topped with a layer of ful (boiled and chrushed fava beans). Palestinians, Israili Arabs and Mizrahi Jews (Jews from Arab and/or Muslim-majority countries) often eat hummus warm or even hot. Most typically hummus is eaten with a flat bread such as pita, but in America it is sometimes scooped up with celery or carrot sticks and sometimes even tortilla chips.
The sources for the recipe below refer to it as "Israeli Hummus" but as the Isareli authors of The Hummus Blog note, "Israeli hummus is pretty much derived from the Palestinian hummus." Indeed the ingredients in the recipe below are widely shared by most hummus makers regardless of nationality. Variations tend to revolve not around the basic indredients but the proportions of the ingredients,flavorings used, particularities of serving and consuming.
The secret to making very smooth hummus is to remove the skins from the garbanzo beans by gently pinching the beans between your index finger and your thumb. For canned garbanzo beans you do this right after you remove them from the can. If you are using dry garbanzos, soak, cook and then let them cool before doing this.
Hummus Ingredients:
- 1 15 ounce can garbanzo beans, drained and rinsed*
- 4 large garlic cloves, peeled
- 1/2 cup of water
- 1/2 cup olive oil
- 1/4 teaspoon cumin
- 1/2 cup tahini, at room temperature (stir paste before measuring)
- 1/4 cup plus 1 tablespoon of fresh lemon juice
- Salt
- Paprika and 1/4 cup of chopped parsley, for garnish
Preparation:
- Set aside 2 tablespoons of the garbanzo beans and add the remaining bean to a food processor.
- Puree with water, half (1/4 cup) the olive oil, half (1/4 cup) the tahini, 1/4 cup of lemon juice, 3 of the garlic cloves, cumin and salt. Process until smooth and creamy. Transfer to a serving bowl.
- Clean the food processor and add the remaining olive oil, tahini, 1 tablespoon water, 1 tablespoon of lemon juice, and garlic clove.
- Process the lemon/tahini mixture until smooth.
- Before serving, make an indent in the center of the hummus and poor the tahini-lemon mixture inside.
- Garnish with paprika, parsley and the whole garbanzo beans and serve with pita bread.
Notes:
* The original recipe (from www.foodandwine.com for this hummus uses 1/2 pound of dried garbanzo beans. To prepare, the beans are soaked in water (along with 1 tablespoon of baking soda) overnight. The next day they are simmered with 7 cloves of garlic (note: cooked garlic is milder than raw garlic, so you need more of it) for 40 minutes. After the beans are tender, pour off and reserve the liquid. Then remove and peel the garlic. Puree the cooked garbanzo beans with 1/2 cup of olive oil, 1/2 cup of the reserved liquid, 1/4 cup of lemon juce, 1/4 cup of tahini 6 cloves of boiled garlic, and the ground cumin. Follow the directions above for making the tahini/lemon topping.
This recipe was adapted from a recipe submitted by Jessica Yoon, the sister of our associate editor, Michelle Yoon. Jessica is currently attending the who is currently resides in Paris, France and is enrolled in Le Cordon Bleu's culinary program. Jessica maintains a food blog called www.jessicasdinnerparty.com
About Falafal:
Just like hummus, Falafel in the Middle East is subject to a lot of partisan debate. Israelis claim it as one of their national dishes and Christian Copts eat it during lent as a meat replacement. Originally a street food in many countries it is also a part of the the Arabian "Mezz" which has many different small dishes served together on one table. While garbonzo beans are the bean of choice for falafels in most countries, fava beans are often used in Egypt and some recipes call for the use of both beans. Falafel dry mix is widely availible (much cheaper if bought in bulk from Henry's Market), just add water mixes tend to make a much drier falafel. Reportedly McDonalds sell falafel burgers in Egypt and elsewhere in the Middle East and calls them "McFalafels." Too bad they are not sold here!
Falafel Ingredients:
- 1 cup dried chickpeas or 16 oz. can of chickpeas or garbanzo beans.
- 1 large onion, chopped
- 2 cloves of garlic, chopped
- 3 tablespoons of fresh parsley, chopped
- 1 teaspoon ground coriander
- 1 teaspoon ground cumin
- 2 tablespoons flour
- Salt
- Pepper
- Oil for frying
Preparation:
- Place dried chickpeas in a bowl, covering with cold water. Allow to soak overnight. Omit this step if using canned beans.
- Drain chickpeas, and place in pan with fresh water, and bring to a boil.
- Allow to boil for 5 minutes, then let simmer on low for about an hour.
- Drain and allow to cool for 15 minutes.
- Combine chickpeas, garlic, onion, coriander, cumin, salt and pepper (to taste) in medium bowl. Add flour.
- Mash chickpeas, ensuring to mix ingredients together. You can also combine ingredients in a food processor. You want the result to be a thick paste.
- Form the mixture into small balls, about the size of a ping pong ball. Slightly flatten.
- Fry in 2 inches of oil at 350 degrees until golden brown (5-7 minutes).
- Serve while still warm
Additional notes: This recipe was adapted from www.mideastfood.about.com Falafels can take the form of balls or pattys. Falafel can be served as an appetizer with hummus and tahini, or as a main course. You can make a falafel "sandwich" (a common way they are consumed in Egypt) by stuffing pita bread with falafel, lettuce, tomatoes, tahini, salt and pepper. Falafel can also be used as a veggie burger, I think it tastes much better than store bought veggie burgers. I should note that I myself have experimented with falafel to make a great tasting veggie burger and the closest I got was with the addition of sautéed mushrooms (cooked until dry and nearly crispy).
- Details
- Hits: 4053
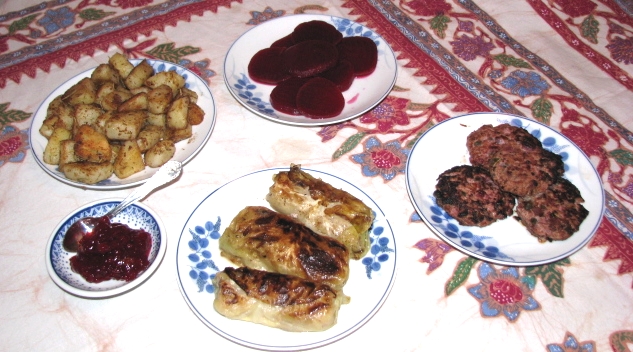
Here are a couple of recipes from the Scandinavian country of Sweden. Often prepared at Christmas time, they can be enjoyed all year long.
Beef Lindström
Most people are familiar with the Swedish word, Smörgåsbord, which is commonly used in America to describe a robust variety of just about anything. Most people also know that the origin of the meaning comes from the Swedish buffet style of serving food for a social occasion. The word is a contraction of "open faced sandwich" and the Swedish word for table, bord. The most elaborate version of smörgåsbord is called julboad (roughly Christmas table, jul=yule). Swedish smörgåsbords consist of a large variety of dishes. Bread, cheese, and butter are essential for a smörgåsbord but other offerings include cold, either pickled or smoked fish dishes (salmon, herring and eel), ham (with mustard), meatballs, crab canapés, sausages, potatoes (done up many ways), hardboiled eggs, cabbage, beets, pickles, cabbage rolls (kåldolmar) mushroom or shrimp omelettes (with béchamel sauces), and more. Usually the dinner follows a progression of eating cold fish dishes to meat cold cuts and finishing off with warm dishes such as Swedish meatballs (köttbullar).
Straight shots (snaps) of strong Swedish alcoholic spirits (notably, aquavit) often heighten the enjoyment of smörgåsbord, a commensal ritual that was immortalized in the song "Smorgasbord and Schnapps" by jazz great Duke Ellington. Not so rarely a Swedish dinner might be kicked off with several rounds of the drinking song Helan Går (which literally means "The whole thing goes down"). The song is so well ingrained that when Sweden won the World Ice Hockey Championship in 1957, after it was discovered that some of the players didn't know all of the words to the Swedish National Anthem, the team decided instead to sing Helan Går!
It is believed that Biff à la Lindström was brought to Sweden in 1862 by Henrik Lindström who was born and raised in St. Petersburg Russia by his Swedish parents. The addition of beets to the recipe reflects the Russian culinary influence.
Beef Lindström Ingredients
- 1 1/2 pound ground (minced) beef
- 4 egg yolks
- 1 yellow onion
- 1 cup pickled beets with juice
- 1 ounce capers
- salt
- butter
- white pepper
Preparation:
- separate 3 egg yolks into a small bowl
- Finely chop 1/2 of a yellow onion
- Dice the pickled beets into small pieces
- Mix the ground beef with the egg yolks, a little water, plus salt and pepper into a smooth mixture
- Blend into mixture the onion, capers and beets plus a hearty splash of the beet juice
- Shape into small round patties
- Fry the beef patties in butter until golden brown on both sides
Kåldolmar
Kåldolmar are Swedish cabbage rolls usually stuffed with rice and either ground or minced beef or pork or a combination of the two. Similar to Biff à la Lindström, Swedish cabbage rolls may have a transcultural origin. As the story goes, after being defeated in the Battle of Poltava by Tsar "Peter the Great" of Russia, the bellicose (no adjective was ever more apt) Swedish king Charles XII fled to Moldavia which was then under control of the Ottoman Empire. The Swedish king spent the next half decade in Ottoman controlled lands before he was able to resume his passion for war with his northern neighbors.
Voltaire was so fascinated by Charles XII that he wrote a biography of him and the English poet penned a poem about Charles entitled, "The Vanity of Human Wishes" which contains the line, "Peace courts his hand, but spreads her charms in vain; 'Think nothing gained', he cries, "till nought remain".
The Swedish word Kåldolmar is a contraction of "Kål" meaning cabbage and "dolmar" derived from the Arabic word for grape leaves, dolma. It is thought that when Charles XII returned to Sweden, either he or his Ottoman creditors brought with them to Sweden the art of making stuffed grape leaves.
The first Swedish literary mention of dolmas (then still made with grape leaves) may be found in Anna Christina Warg's 1755 book Hjelpreda I Hushållningen För Unga Fruentimber (Assistant in Housekeeping for Young Women) which became for many decades a leading household guide for women in Sweden, Finland, and Germany.
While Kåldolmar are often eaten with boiled or mashed potatoes—now considered essential staples in Sweden—Warg's guide pre-dates the introduction of potatoes into the Swedish diet.
So interconnected are Kåldolmar, Charles XII and Swedish national identify that the Friends of the Cabbage Roll (Kåldolmens vänner) created the holiday "Kåldolmens dag" (Day of the Cabbage Roll) which is commemorated on November 30th, the day of Charles XII's death.
Kåldolmar Ingredients
- 1/2 cup white (short grain is best) rice
- 1½ cups milk
- 1/2 pound of ground beef
- 1/2 pound of ground pork
- 1 head of cabbage
- ½ cup water
- salt, white pepper, thyme
- margarine or butter
- ½ cup light cream
Preparation
- Remove the leaves from the cabbage and boil them in salted boiling water. If the leaves are hard to remove,cut around the bottom of the cabbage where the leaves attach to the base. Then stick a fork in the base of the cabbage and then lower the cabbage into boiling water. In less than a minute the outer leaf will soften to the point that it may be separated from the leaf below it. Tranfer the leaves to a bowl near the boil pot. Use rubber gloves and be very careful so that you don't injure yourself by the steam or boiling water!
- Return the loose leaves to the boiling water and cook them until they are slightly transluscent (about 5-6 mins)
- Remove cooked leaves from the boiling water and shake the water off or dry them with paper towels
- Trim the coarse centre vein of each cabbage leaf (or trim the lower part of the leaf)
- Cook rice in a covered pot until the rice is almost done (about 12 minutes after water comes to a boil) Note, different kinds of rice require different amounts of water, follow rice package instructions to learn proper amount.
- Stir in milk and cook till the mixture stiffens
- Let rice cool and then add meat and spices to the mixture
- Put a large tablespoonful of filling on each cabbage leaf
- Fold the leaf around the filling like you would a burrito or an egg roll
- Heat butter on medium heat in a skillet and lightly brown the Kåldolmar on both sides
- Transfer rolls to a casserole or wide pot
- Spear each roll with a toothpick or two to ensure the rolls don't unravel in the pot.
- Cover rolls with water (or beef broth) and simmer for 15 minutes
- Add the cream and cook for another 15 minutes
Both Biff à la Lindström and Kåldolmar can be complimented by some lingonberry preserve which can be obtained at any Ikea store restaurant.
Recipe by T. Johnston-O'Neill
Photo by Shari K. Johnston-O'Neill
- Details
- Hits: 4466

Chef and cookbook author Julia Child also celebrated French culture and cuisine. Her classic Mastering the Art of French Cooking (co-authored by Simone Beck and Louisette Bertholle) has for the past 50 years teaching amateur cooks and professional chefs the sublime secrets of French cooking. One of her most notable recipes is for Boeuf Bourguignon the quintessential French "peasant" dish, perhaps the ultimate French comfort food. The dish was the subject of the very first episode of Julia Child's path breaking television series "The French Chef". There are, of course, many ways to make Boeuf Bourguignon, and Julia Child herself published different versions in her many books. The version she presented on her TV show is also somewhat different than the one she offered in "MAFC". The version below is derived from her TV show, it is a bit stripped down and a bit easier to make than the version found in her first book. As Chef Child points out, the recipe embraces a wide range of versatile and useful techniques that are employed in French cooking but can be used in many other styles of cooking as well. One nifty thing to know is if you substitute chicken for beef in this recipe, shorten the cooking time (chicken cooks in only 1/2 hour!) and add a 1/3 of a cup of cognac, but keep everything else the same (including the red wine) voila! you will have coq au vin! The techniques required for Boeuf Bourguignon are easy to learn (and you will be glad you learned them even if you never cook the dish again), but the dish takes a long time (more than 3 hours) to prepare. Fortunately much of that time is spent just waiting for the dish to complete cooking, requiring a minimum of intervention. It's not fast food.
Boeuf Bourguignon is a beef stew that originated from the Burgundy region of France (the dish's name literally means "Burgundy Beef"). It started as a peasant dish that eventually became a well known haute cuisine dish fit for the fanciest of occasions. Quite naturally the wine used is a Burgundy red wine but other full bodied red wines can be used as well. Be aware that expensive wines become worse and cheap wines become better with cooking, Julia Child's contention that you should use the best possible wine for cooking is no longer considered to be wise. However, it is best to avoid wine with strong tannins (they will turn bitter) or any wine sold as "cooking wine" (which is had added salt to make it undrinkable). An inexpensive Pinot Noir (a variety that originates from Burgundy and is also known as "Red Burgundy"). Cabernet Sauvignons, Zinfandels and Syrahs are less good because of their strong tannins.
Ingredients
- light olive oil (not extra virgin which burns too easily) or peanut oil
- 3 pounds chuck, cut into 2-inch cubes
- 1 teaspoon salt
- 1/4 teaspoon. pepper
- 3 tablespoons flour
- 3 cups red Burgundy wine
- 2 or more cups beef stock or beef bouillon
- 1 tablespoon tomato paste
- 2 cloves mashed garlic
- 1 teaspoon thyme
- 1 crumbled bay leaf
- 18 to 24 small white onions.
- 1 pound quartered fresh mushrooms
- 2 tablespoons of butter
Preparation
Don't be put off by the number of steps in this recipe, they flow naturally and logically and all are very easy to manage even for the beginner cook!
Equipment needed: Covered casserole dish or Dutch oven, large frying pan.
- Cut beef into 2-inch cubes and dry the beef in paper towels (it helps with browning).
- Sauté the beef in a large frying pan a few pieces at a time, in the hot oil browned on all sides.
- Move brown beef to the oven-safe casserole pan.
- Pour the wine in the still-hot frying pan and scrape the bottom of all the residual bits on the bottom of the fry pan (this is called deglazing).
- Stir the wine from the frying pan and then the beef stock into the casserole dish so that the meat is barely covered.
- Pre-heat your oven to 350° F.
- Blend in the tomato paste, garlic and herbs to the casserole dish.
- Bring casserole dish to a simmer on top of the stove.
- Cover the casserole and then place it in the lower third of the preheated oven.
- Regulate the oven heat so liquid simmers very slowly.
- Cook for approximately 3 hours. The meat is done when a fork pierces it easily.
- While the beef is cooking, prepare the onions and mushrooms. Check the oven ever so often to see if the temperature is right. The Bourguignon should be lightly simmering not boiling.
Prepare the Pearl Onions:
- Boil a quart of water.
- Add the onions to the boiling water.
- After the water boils again wait 20 more seconds, then remove pan from stove and then remove the onions from the water.
- slice off the ends of the pearl onions and peel them.
- Return the onions to a sauce pan of boiling water, reduce heat to a simmer and cook for 10 mins. Again, light simmering is what you are aiming for, not boiling.
- Remove onions from pot and cool so that they can be handled.
- Carefully pierce the bottom end of each onion with a small knife. Prepare the Mushrooms:
- Wash and then dry the mushrooms.
- Remove the stems from any mushrooms that have open caps and then quarter them.
- For mushrooms that have closed caps, remove and slice stems (one or two cuts) and then quarter the caps.
- Add 2 tablespoons of butter and 2 tablespoons of oil to a large frying or saute pan and heat on medium high heat.
- With a spoon or spatula mix the melted butter with the oil and then heat until the butter no longer bubbles (important, don't omit).
- Add the mushrooms to the pan and brown lightly. Do not overcrowd the mushrooms, cook in two or more batches if necessary! Overcrowding or using too low of a heat will cause the musrooms to lose all their juices.
Final Preparation
- After the meat has reached proper tenderness (3 hours or more), remove casserole from oven and pour the contents into a sieve or strainer set over a saucepan.
- Return the beef to it
- Distribute the cooked onions and mushrooms over and around the meat.
- With a ladle, skim any accumulated fat off the sauce in the sauce pan.
- Mix into a paste 2 tablespoons of softened butter and 3 tablespoons of all purpose flour in a small bowl or cup.
- Blend in butter/flour mixture to the sauce.
- Heat sauce just to a boil keeping everything moving with a sauce whip. It will thicken.
- Taste the sauce and add salt and pepper to taste (a little at a time, re-tasting as you go).
- Pour the sauce over the meat and vegetables.
- Cover the casserole and simmer on the stove top for 3 minutes, folding over the ingredients so that everything is covered in sauce.
- Serve in its casserole, or arrange the stew on a platter surrounded with potatoes, noodles, or rice, and decorated with parsley.
- Details
- Hits: 3896
 >
>Coconut Burfi (Photo by Vijaya Vedantham)
Burfi is a confection that is extremely popular throughout India. Made from a wide variety of ingredients burfi are rich, dense mildly sweet two-bite sized cut into the shapes of quadrilateral polyg<khoya) made from boiled until thickened condensed milk, boiled down cream or sometimes dried milk powder, and flavored and colored with mango, chocolate, saffron, rose water, coconut figs and carrot. Burfi are often topped with various ingredients such as slivered almonds, chocolate or an edible metallic foil. Sometimes burfi are made in layers. Often the shape of the burfi is an indication of its ingredients; saffron burfi are often flattened rounds, cashew or pistachio burfi are typically diamond-shaped and coconut flavored cham cham are pink and round (or obloid). Burfi are great as a snack or as a finale to delicious Indian meal. The best place to buy burfi here in San Diego is at the restaurant/snack shop Surati Farsan in Little India off of Black Mountain Road in Mira Mesa. Make 'em and take 'em to a potluck and not only will they be the talk of the party, but they will all disappear! The two burfi recipes were submitted by our fabulous "Calendar Master," Vijaya Vedantham, who hails from Mumbai. Ingredients are readily available in local Indian food markets.
Coconut Burfi
Ingredients:
- 1 cup sugar
- 3/4 cup grated fresh coconut
- ¼ cup cashew nut powder (Optional, if not used substitute 1 cup finely grated fresh coconut)
- 1 tablespoon butter/ghee
- 1 teaspoon green cardamom powder
Preparation:
- Mix all the ingredients together
- Add mixture to a dry pan and heat on medium mixing continuously
- Continue cooking and mixing until it thickens
- Mix in ghee or butter
- Stir the mixture until it no longer sticks to the pan. It takes a long time and if you stop mixing it will burn!
- Grease a pie can (or better yet a small square pan) with butter
- Spread mixture in the bottom of the buttered pan and let cool
- Slice Coconut Burfi into 1 ½ inch squares
Badam (Almond) Burfi
Ingredients:
- ½ cup whole un-roasted almonds
- ½ cup un-roasted cashew nuts
- 1 cup sugar
- 1 teaspoon green cardamom power
- 1 teaspoon ghee or unsalted butter
Preparation:
- Soak almonds for 1 hour in warm water and then drain
- Soak cashews in warm water for ½ hour and then drain
- Peel off the almond skins
- Grind both nuts together in the blender without adding water until you have a paste
- In a deep pt add sugar and some water and heat on medium flame. Amount of water should be just enough to soak the sugar. Do not add too much water.
- Heat till sugar melts and the syrup begins boil and thicken
- After the syrup thickens add the nut paste & cardamom powder and keep mixing. Continue mixing without stopping until the mixture thickens
- Add ghee/butter once the mixture thickens
- Continue mixing until the mixture no longer sticks to the pan
- Grease a pie can (or better yet a small square pan) with butter
- Spread mixture in the bottom of the buttered pan and let cool
- Slice Almond Burfi into 1 ½ inch squares
Recipe and photo by Vijaya Vedantham
- Details
- Hits: 4375
Joomla!
Extensions
The Joomla! content management system lets you create webpages of various types using extensions. There are 5 basic types of extensions: components, modules, templates, languages, and plugins. Your website includes the extensions you need to create a basic website in English, but thousands of additional extensions of all types are available. The Joomla! Extensions Directory is the largest directory of Joomla extensions.
Components
Components are larger extensions that produce the major content for your site. Each component has one or more "views" that control how content is displayed. In the Joomla administrator there are additional extensions such as Menus, Redirection, and the extension managers.
Modules
Modules are small blocks of content that can be displayed in positions on a web page. The menus on this site are displayed in modules. The core of Joomla! includes 24 separate modules ranging from login to search to random images. Each module has a name that starts mod_ but when it displays it has a title. In the descriptions in this section, the titles are the same as the names.
Content Modules
Content modules display article and other information from the content component.
User Modules
User modules interact with the user system, allowing users to login, show who is logged-in, and showing the most recently registered users.
Display Modules
These modules display information from components other than content and user. These include weblinks, news feeds and the media manager.
Utility Modules
Utility modules provide useful functionality such as search, syndication and statistics.
Navigation Modules
Navigation modules help your visitors move through your site and find what they need.
Menus provide your site with structure and help your visitors navigate your site. Although they are all based on the same menu module, the variety of ways menus are used in the sample data show how flexible this module is.
A menu can range from extremely simple (for example the top menu or the menu for the Australian Parks sample site) to extremely complex (for example the About Joomla! menu with its many levels). They can also be used for other types of presentation such as the site map linked from the "This Site" menu.
Breadcrumbs provide users with information about where they are in a site.
Page 20 of 28

